- [Case Studies](https://www.mergado.com/category/case-studies)
- [eCommerce tips](https://www.mergado.com/category/ecommerce-tips)
- [Online Store Solutions and Platforms](https://www.mergado.com/category/online-store-solutions-and-platforms)
- [Mergado Pack](https://www.mergado.com/category/mergado-pack)
- [Mergado tips](https://www.mergado.com/category/mergado-tips)
- [Mergado News](https://www.mergado.com/category/mergado-news)
- [eCommerce News](https://www.mergado.com/category/ecommerce-news)
- [How to use Mergado](https://www.mergado.com/category/how-to-use-mergado)
- [Interviews with e‑commerce gurus](https://www.mergado.com/category/interviews-e-commerce-gurus)
- [Extensions](https://www.mergado.com/category/apps-bidding-image-marketing-and-more)
- [Expansion with Mergado](https://www.mergado.com/category/expansion-with-mergado)
- [Mergado Lifestyle](https://www.mergado.com/category/mergado-lifestyle)
1. [ Home ](https://www.mergado.com/)
2. [ Mergado Blog ](https://www.mergado.com/blog)
3. [ Case Studies ](https://www.mergado.com/category/case-studies)
4. **Master dynamic remarketing of Google Ads with non-e-commerce website using Mergado Pack and Google Web Designer**
# **Master dynamic remarketing of Google Ads with non-e-commerce website using Mergado Pack and Google Web Designer**
[  Lukáš Horák ](https://www.mergado.com/blog/lukas-horak) [Case Studies](https://www.mergado.com/category/case-studies)
6. 5. 2021
5 minutes read

For sectors outside online stores, setting up dynamic remarketing requires technical adjustments on the web, preparation of your feed, and also a dynamic banner that will display information from the prepared feed. You will **learn how to prepare it all** in the case study by PPC specialist [Hana Kobzová](https://hanakobzova.cz/).
function tableOfContents() {
return {
headings_menu: [],
heading_active: '', // Added to track the active section
shouldBeSticky: false,
generateToC() {
const headings = document.querySelectorAll('.js-article-full-headings h2, .js-article-full-headings h3');
let headingMap = {};
headings.forEach((heading) => { // Use an arrow function to maintain `this` context
// Normalize heading text to remove diacritics, then replace non-alphanumeric characters with dashes
var normalizedText = heading.textContent.normalize("NFD").replace(/[\u0300-\u036f]/g, ""); // Remove diacritics
var id = heading.id ? heading.id : normalizedText.trim().toLowerCase()
.split(' ').join('-').replace(/[^a-z0-9\-]/ig, ''); // Updated regex to replace non-alphanumeric characters
headingMap[id] = headingMap[id] !== undefined ? ++headingMap[id] : 0;
// Use the updated `id` with diacritics removed for the heading id and the TOC
const finalId = headingMap[id] ? `${id}-${headingMap[id]}` : id;
this.headings_menu.push({
id: finalId,
title: heading.textContent,
level: heading.tagName.toLowerCase(), // Track heading level
active: false, // Initially set active to false
});
heading.id = finalId;
});
},
checkStickyNeeded() {
const ul = this.$el.querySelector('ul');
if (ul) {
this.shouldBeSticky = ul.scrollHeight < window.innerHeight;
}
},
setActiveHeading() {
// disabled not working with active state on click
// add @scroll.window="setActiveHeading()" to the parent div
// const headings = document.querySelectorAll('.js-article-full-headings h2');
// let activeHeading = '';
// let closestHeadingDistance = Infinity;
// headings.forEach((heading) => {
// const rect = heading.getBoundingClientRect();
// const offset = rect.top - window.innerHeight / 2; // Consider heading in the middle of the screen as active
// if (offset < 0 && Math.abs(offset) < closestHeadingDistance) {
// activeHeading = heading.id;
// closestHeadingDistance = Math.abs(offset);
// }
// });
// // Update the active state in headings_menu
// if (activeHeading !== this.heading_active) {
// this.headings_menu = this.headings_menu.map(item => ({
// ...item,
// active: item.id === activeHeading,
// }));
// this.heading_active = activeHeading;
// }
},
setActiveItem(clickedId) {
this.headings_menu.forEach(item => {
item.active = (item.id === clickedId);
});
this.heading_active = clickedId; // Optionally update the heading_active property if used
},
};
}
1. —
For sectors outside online stores, setting up dynamic remarketing requires technical adjustments on the web, preparation of your feed, and also a dynamic banner that will display information from the prepared feed. You will **learn how to prepare it all** in the case study by PPC specialist [Hana Kobzová](https://hanakobzova.cz/).
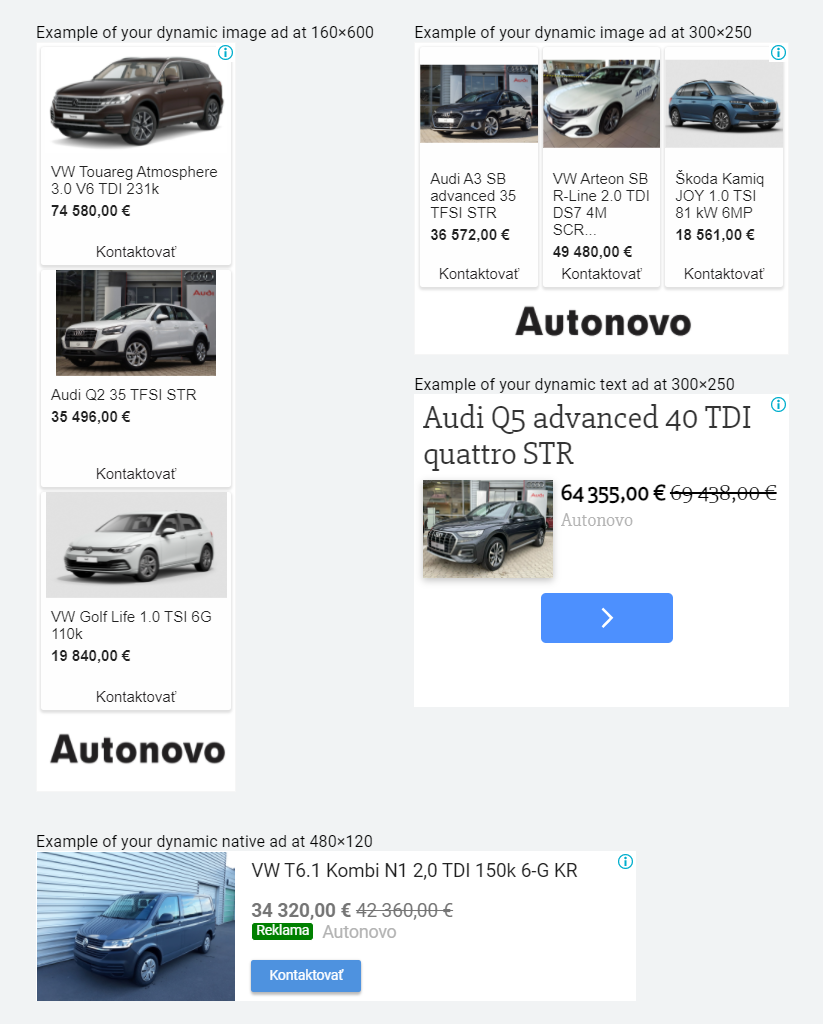
After reading it, you will be **able to create remarketing for non-e-commerce websites**, whose dynamic advertising may look like this:
[  ](https://www.mergado.com/sites/default/files/perm/paragraph-image/webpnet-resizeimage.png)
As a PPC specialist, I usually encounter static banners in remarketing or dynamic remarketing in e‑commerce projects. How about if you have a client for whom dynamic remarketing would be ideal, but it is not an online store?
For my client Autonovo, who sells cars in Slovakia, I decided to create such a dynamic remarketing.
### **The whole process consists of 3 steps:**
1. [Feed preparation](#priprava_feedu)
2. [Remarketing code implementation](#implementace_kodu)
3. [Preparing a dynamic ad and creating a campaign](#priprava_kampane)
## 1. FEED PREPARATION
- ### Creating a feed in Mergado Pack
Cars cannot be sold through Google Shopping, so you can’t use Google Merchant Center.
In addition to retail, Google Ads also offer feed settings for other industries, such as education, hotels, air travel, but the automotive sector is not one of them. So I had to **use my feed**.
The client’s website is built on WordPress, and even though cars cannot be purchased online, the WooCommerce plugin is used to display and manage them. It made it **possible to implement the** [Mergado Pack for WooCommerce](http://pack.mergado.com/woocommerce) and easily prepare the feed.
On the website side, [install](https://youtu.be/NOnVHM1W6EE) the Mergado Pack and **copy the URL of the product feed in the XML feed tab**. Go to Mergado and create a new export.
[](https://pack.mergado.com/)
If you **do not have an account in Mergado yet**, I recommend that you go through [Get Started with Mergado](https://www.mergado.com/get-started), where you find all the necessary information.
The input format for the new export is Mergado XML, and for the output format, I chose Google Ads Dynamic Remarketing \[sk\]. It is prepared for cases where it is not possible to use the prepared Google Shopping format, which is intended for retail.
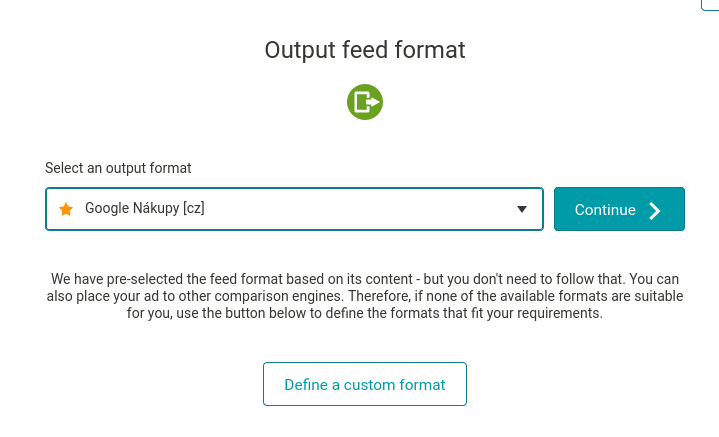
Once you have completed the export creation wizard, in the product overview, **check** if the individual elements are alright and whether additional adjustments are required.
In my case, I used the queries and [rules](https://www.mergado.com/tag/rules-in-mergado) for the ITEM DESCRIPTION attribute (product description) to **remove** HTML characters. And in the SALE PRICE attribute, I **added** missing currency.
Also, **don’t forget to set** [cron](https://www.mergado.com/automation-with-crons) to update the feed regularly. Otherwise, you won’t have up-to-date information in it over time. The link you will need to set up cron with can be found in the Cron Tasks tab in Mergado Pack.
You prepare the dynamic feed by this method.
- ### Creating a dynamic ad source in Google Ads
The created feed needs to be **uploaded** to the Company Data in Google Ads. Go to your Google Ads account, select Tools => Company Information at the top right. Click Add => Dynamic Ad Source => Custom.
For the next step, you need to **save** the output feed from Mergado to your disc. Only one step needs to be done. Then the feed will be updated automatically via the URL.
**Upload** the feed stored on the disc to Google Ads, and if Google doesn’t find any issues, confirm its creation. In case of errors, you will have to fix them in Mergado.
If the feed is already recorded in the Company Data, open it and go to the Schedules tab on the left. We will now **set up a regular update of the data in the feed**. Select HTTPS and paste the output URL of the Mergado feed into the source URL. Adjust the frequency as required. The shortest frequency available is an update every 6 hours.
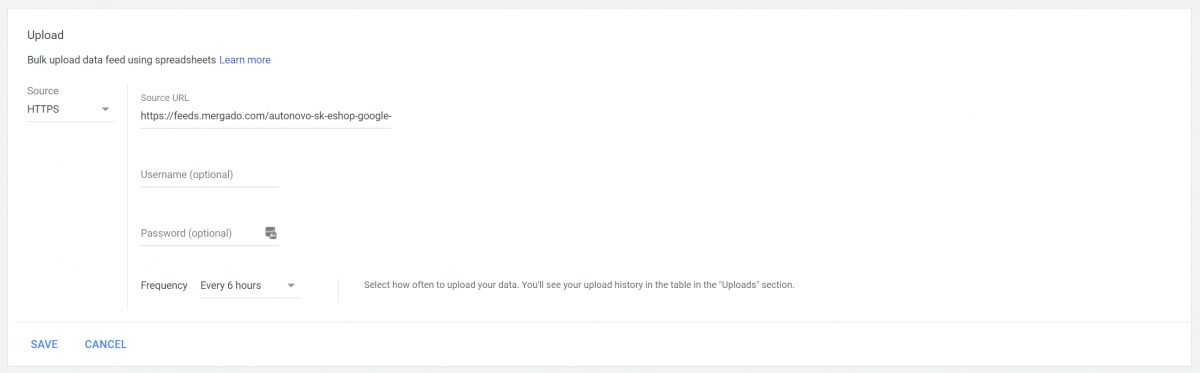
Save the settings and then click the Update button to **check if the upload is set up correctly**.
Then go to the Upload History to **see if the update was successful**.

## 2. IMPLEMENTING THE DYNAMIC CODE ON THE WEB
- ### Implementation of the dynamic code on the web
For the system to recognize which vehicles the user has visited on the website, **a dynamic remarketing code must also be inserted on the website**. It must first be activated in Google Ads.
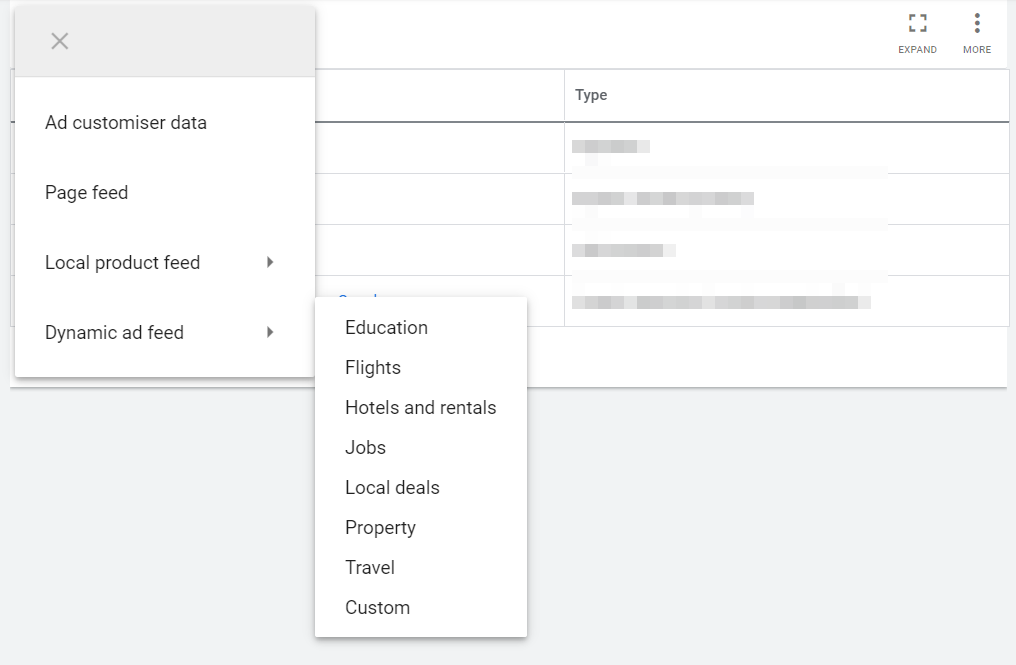
Go to Tools => Audience Manager => Audience Sources. Add a Google Ads feed and choose your remarketing type correctly when setting it up. In this case, it is the Own company type.
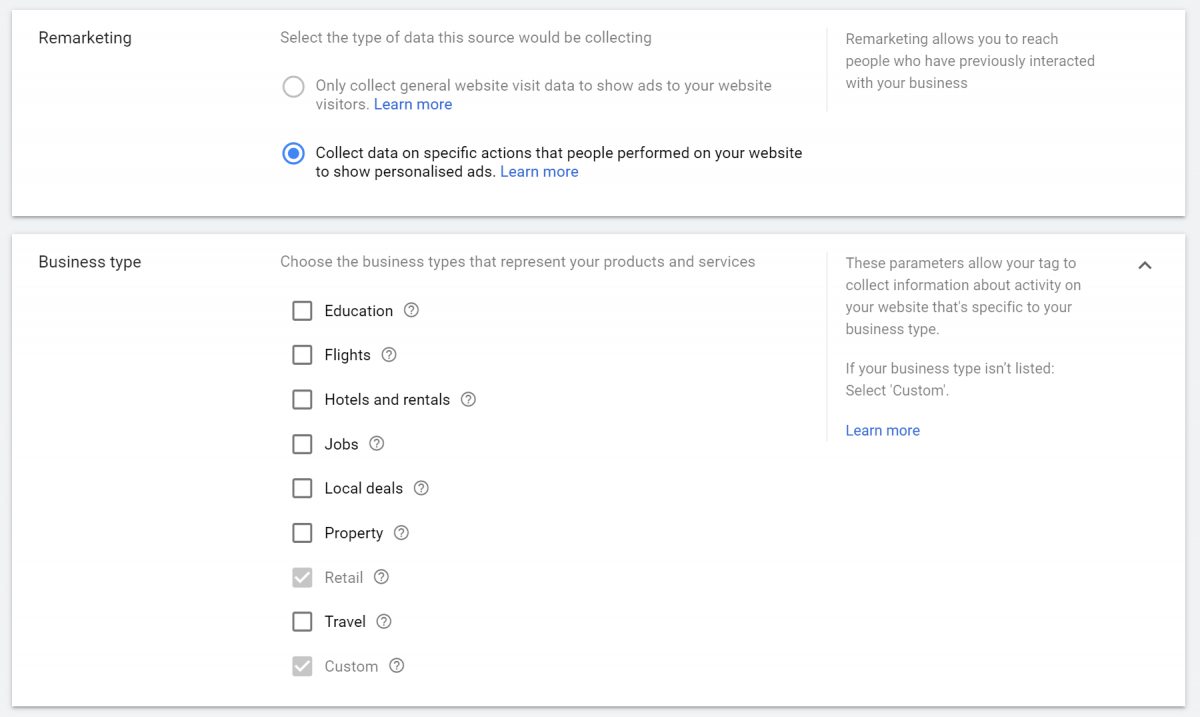
In the picture, you can also see the Retail type, which is intended for online stores. In addition to the sale of vehicles, the client also runs an online store.
- ### Getting and entering conversion number
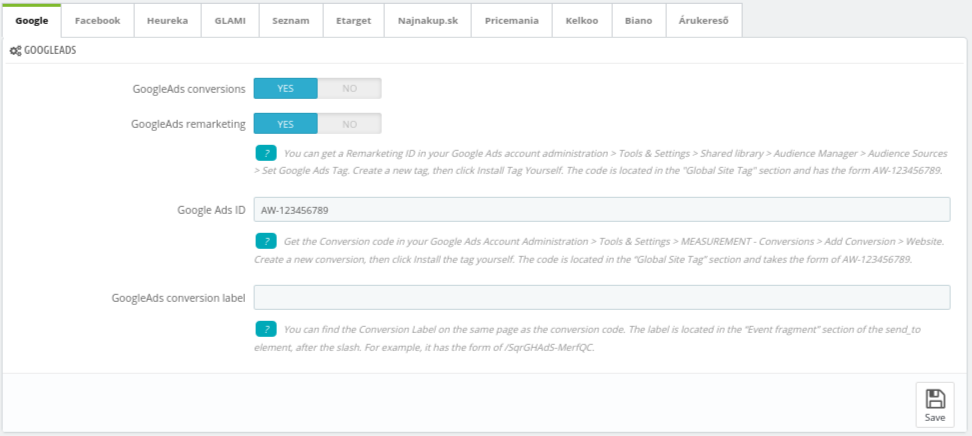
After confirming the settings, you will get to the next step. Here you get the necessary **conversion number**. I recommend using Google Tag Manager, from which you can conveniently copy it.
This number must now be **entered in the Mergado Pack**. Go to Ad systems, and in the Google tab, you will see the Google Ads section where you need to:
1. **Check** to enable Google Ads remarketing.
2. **Paste** the copied conversion number into the Ads code field in the format AW-conversion number, e. g. AW-123456789.
## 3. CAMPAIGN PREPARATION
- ### Dynamic advertising
Before you start, creating **dynamic advertising** is required. You can choose to use responsive advertising for the content network, which is the easiest solution. However, using this format will not ensure that a dynamic variation of your ad is always shown.
Dynamic ads with responsive ads for the content network can look like this:
- ### Responsive advertising
If you have **specific requirements** for an ad, you can create a responsive ad using [Google Web Designeru](https://webdesigner.withgoogle.com/). My goal was to show a good price for vehicles in my ad.

## Creating a dynamic ad in Google Web Designer
Google Web Designer is a free tool from Google for creating HTML5 banners, including dynamic ones. It **takes** **time** to learn how to work in it. You can find video tutorials on Youtube, or you can find graphics that can work with this tool and create an advertisement for you.
I created the ad myself. I had an **idea of what information** I wanted to display on it. So I went the way of editing an existing template.
When you open Google Web Designer, a window will pop up where you can select Use template. Activate the following **filters**:
- Platforms: Google Ads
- Features: Dynamic
- Dimensions: Responsive
- Dynamic Vertical: Custom
[ 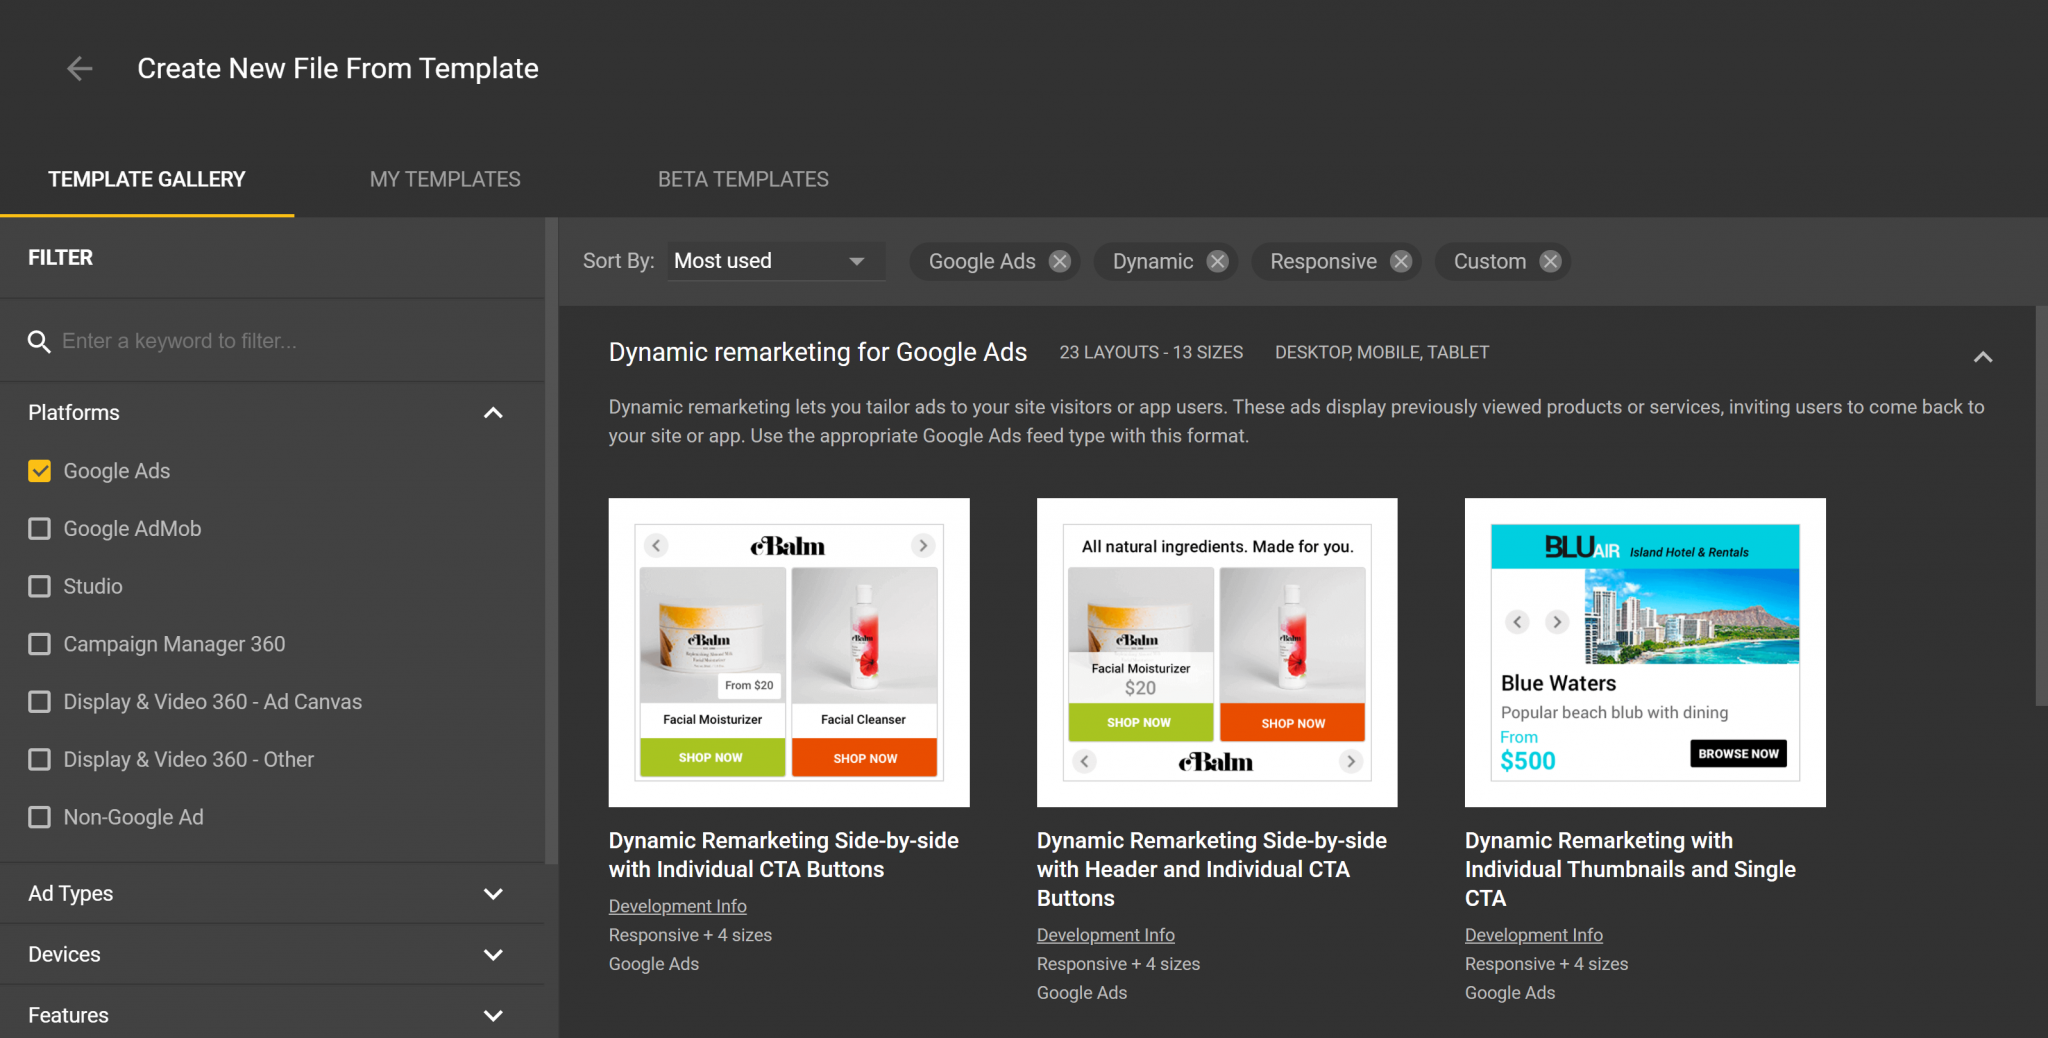 ](https://www.mergado.com/sites/default/files/perm/paragraph-image/img13.png)
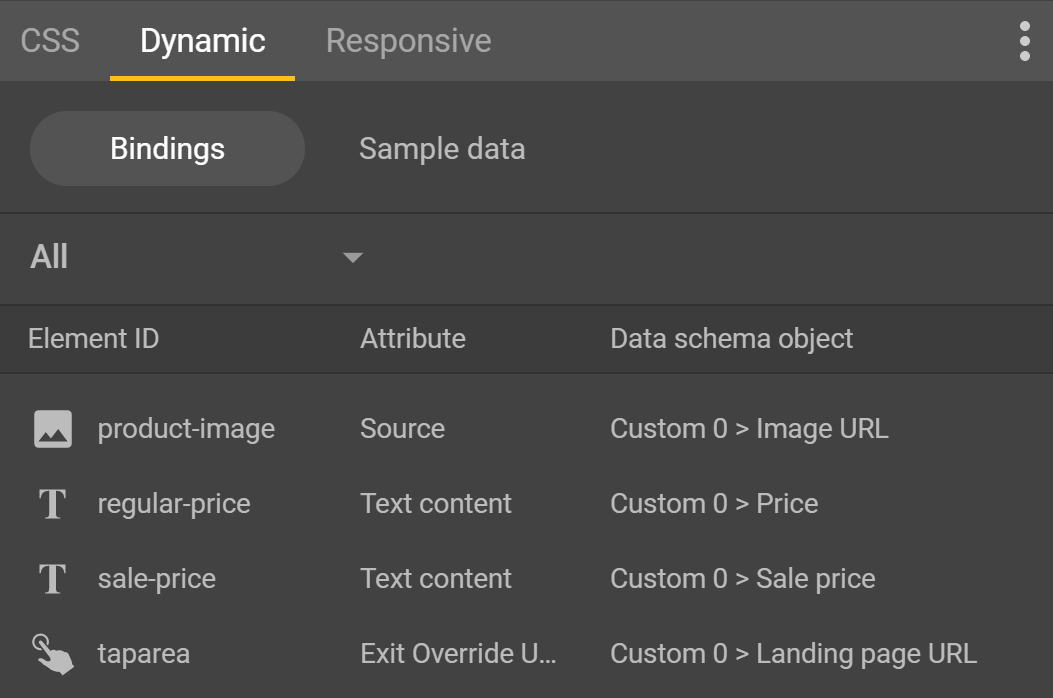
Choose one of the **templates** that matches the look you want. Then edit the **texts**, **logo** and **link** the individual dynamic parts of the ad to the feed parameters in the Bindings section.
[  ](https://www.mergado.com/sites/default/files/perm/paragraph-image/img14.png)
Once you’ve finished your ad, **save** **it** via File => Publish => Locally. Then upload the resulting ZIP file to Google Ads later.
## Creating a campaign in Google Ads
The last step is to **create a campaign**. The process is the same as creating any other dynamic remarketing campaign. In the campaign settings, don’t forget to choose the prepared feed from the Company data.
[ 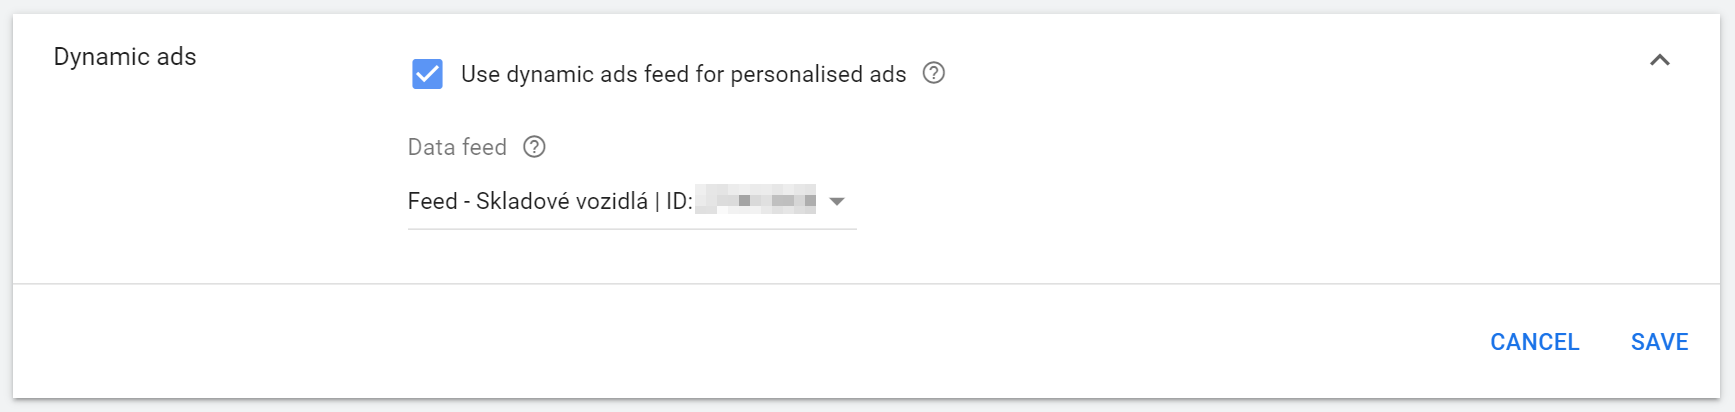 ](https://www.mergado.com/sites/default/files/perm/paragraph-image/ajimg10.png)
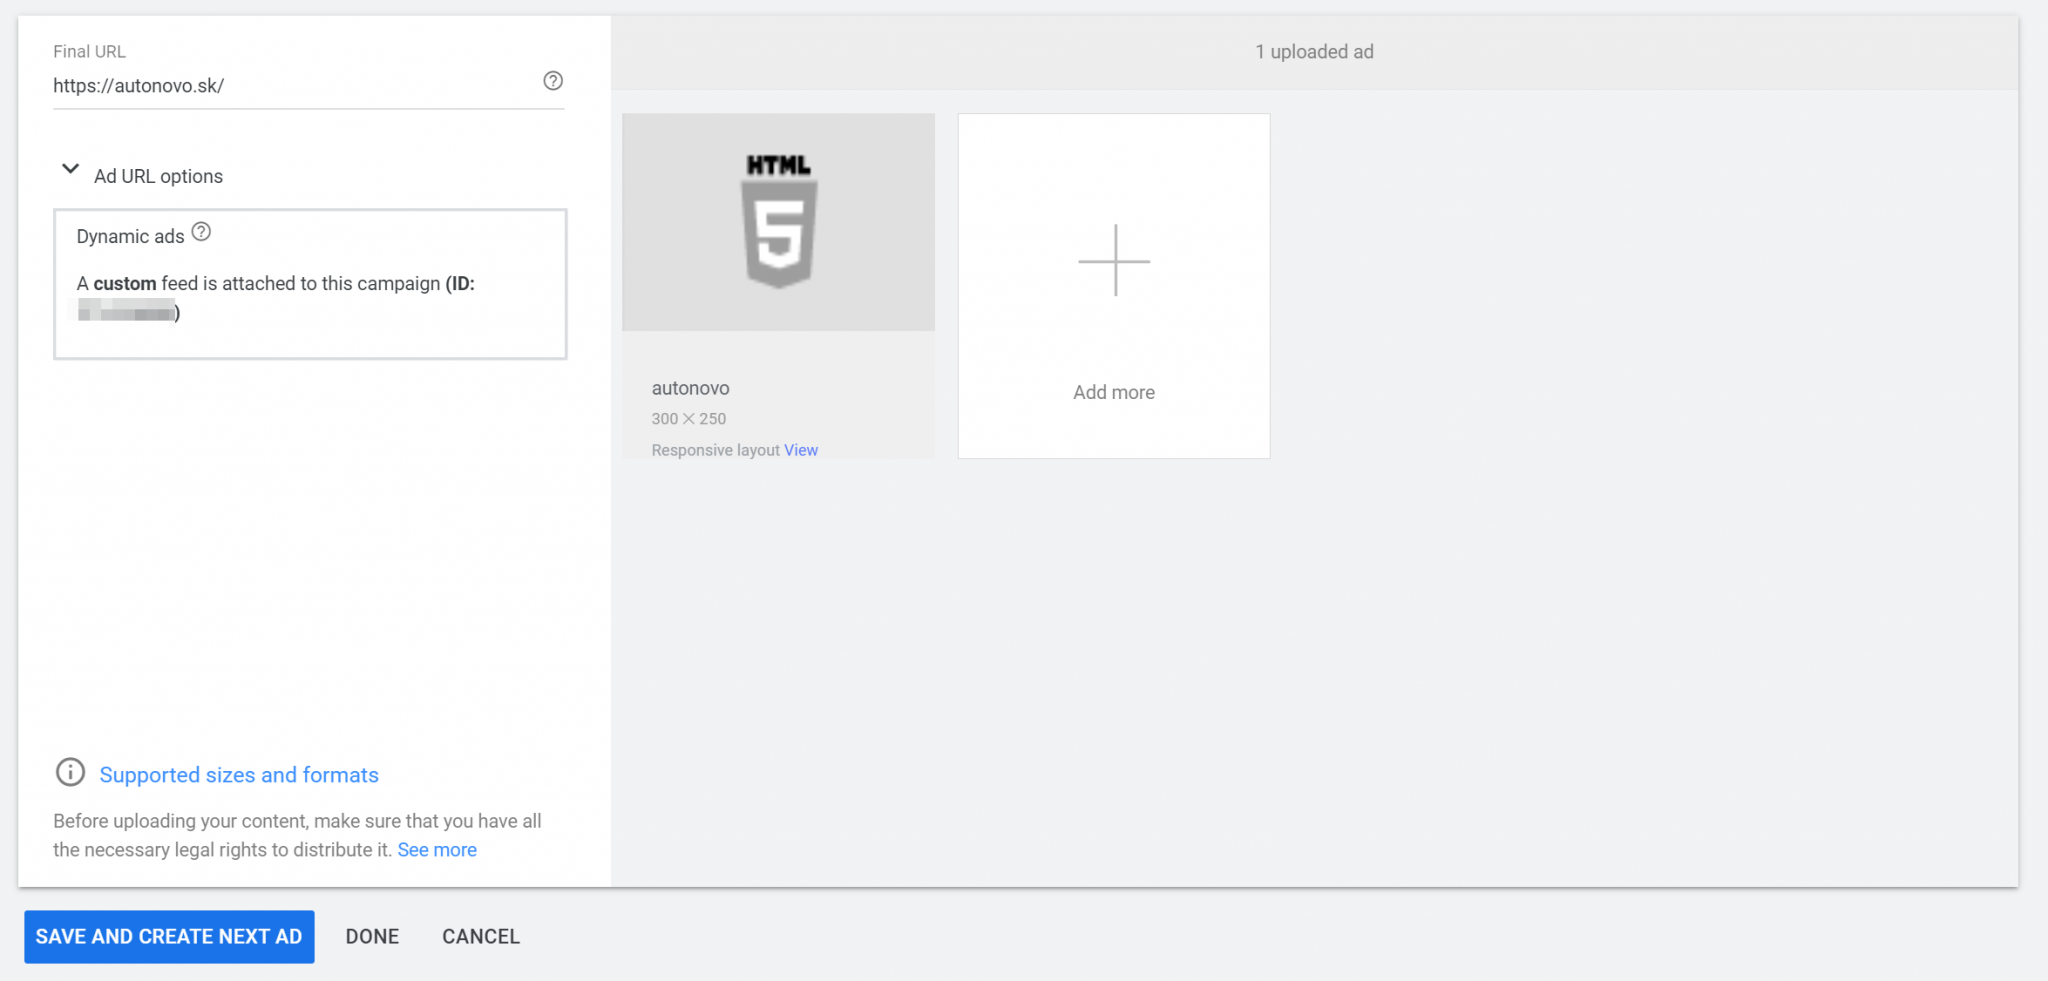
You can **choose** Responsive Content Ad as your ad or upload your content ad if you’ve followed the Google Web Designer route.
[  ](https://www.mergado.com/sites/default/files/perm/paragraph-image/ajimg11.png)
In the next step, **upload a ZIP file with the ad** and fill in the Destination URL. Save your new ad, and you are done.
[  ](https://www.mergado.com/sites/default/files/perm/paragraph-image/ajimg12.png)
### Let’s summarize the procedure in more detail in points:
1. installation of Mergado Pack for WooCommerce
2. creating a new export in Mergado, type Google Ads Dynamic Remarketing \[sk\]
3. cron settings
4. creating a dynamic ad source in Google Ads
5. setting up a regular feed update in Google Ads
6. activating remarketing in Mergado Pack
7. creating ads in Google Web Designer
8. creating a campaign in Google Ads
The whole process of setting up dynamic remarketing may seem complicated. But by using Mergado and Mergado Pack you have 2/3 of the work done in a while **without the need for technical knowledge**. If you take the path of responsive advertising for the content network, I dare say that you can set up your entire campaign in two hours.

*The author of this article is PPC specialist Hana Kobzová.*
 Mergado with a 30-day free trial
- optimize your feed by yourself and save the cost for the developer’s time
- full access to all features already in the trial version
[Try Mergado for free](https://accounts.mergado.com/register/)

[  ](https://www.mergado.com/blog/lukas-horak)### [ Lukáš Horák ](https://www.mergado.com/blog/lukas-horak)
Lukáš takes care of most of the Czech and English communication in Mergado. Through blogs, e‑mail, and social networks, he regularly supplies readers with e‑commerce news and news and tips from Mergado. In his time off, he enjoys simple things like badminton, digging the hidden gems of the 80’s, and seafood served with red wine.
## What you *might be interested in next*
[ 
### How Feed Optimization Unlocked Meta Ads Performance without Increasing Ad Spend
](https://www.mergado.com/blog/feed-optimization-for-meta-ads)
[ 
### The Real Impact of Visual Product Image Optimization on Meta Campaign Performance
](https://www.mergado.com/blog/visuals-for-meta-campaigns)
[ 
### How We Migrated an E‑Shop from Shoptet to Shopify with Mergado: A Complete Migration Without Data Loss
](https://www.mergado.com/blog/how-we-migrated-e-shop-shoptet-shopify-mergado-complete-migration-without-data-loss)
## Don’t miss *anything*
Sign up for our newsletter
By logging in, you agree that we will process your data by the [terms of personal data protection](https://www.mergado.com/cookies).
Thank you, you have successfully joined our subscriber's list.
function ml_webform_success_5807248() {
var r = ml_jQuery || jQuery
r('.ml-subscribe-form-5807248 .row-success').show(), r('.ml-subscribe-form-5807248 .row-form').hide()
}